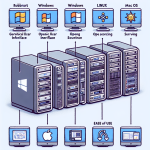
DIY Gaming Server
When I first ventured into the world of homelabs, the excitement was palpable. The notion of creating my own little realm of technology, where I could test out applications and run various experiments, was thrilling. But over time, I realized that this journey could extend far beyond simple server setups. Today, I want to share my heartfelt journey into homelab gaming—an adventure that has transformed my gaming experience and could do the same for you.
Why Homelab Gaming?
There’s something magical about being in control of your gaming environment. Whether you’re a casual player or a competitive gamer, having a dedicated gaming server opens up a world of possibilities. Here’s why I believe every gamer should consider this:
- Customization: You can tailor your gaming environment to suit your personal tastes.
- Performance: Running your own server means fewer lag spikes and smoother experiences.
- Multiplayer Experience: Host friends or create a community with your own gaming server.
- Experimentation: Test out new games or server configurations without fear.
Building your own DIY gaming server allows you to level up your experience. I can still remember the first time I logged into a game hosted on my private server; the sense of ownership and control was incredible satisfying.
Getting Started: Your First Steps
Starting a homelab gaming setup doesn’t have to be a daunting task. The beauty of it is that you can build it slowly, piece by piece. Here’s how I began my journey:
1. Choose Your Hardware: The first step is to decide what kind of server you want to use. Many gamers opt for refurbished servers or desktops. I personally started with an old PC I had lying around. The key is to ensure your hardware can handle the games you want to play.
2. Select Your Operating System: For my server, I decided on Ubuntu Server after reading about its stability and community support. Others might prefer using Windows Server if that’s what they’re used to.
3. Install Virtualization Software: I use Proxmox, a free and open-source virtualization platform that allows me to create multiple virtual machines (VMs). This is where the magic happens! You can allocate resources based on the games you want to host.
Launching Your Gaming Server
Once I set up my hardware and OS, it was time to get down to the nitty-gritty: launching my first gaming server! Here’s how I went about it:
– Pick a Game: The excitement really kicked in when I decided on which game to host first. I chose an old favorite, Minecraft. Its server setup was simple enough for a first-timer like me.
– Follow the Online Guides: There are countless resources online that provide step-by-step instructions on how to install games on a server. I found excellent help at [Minecraft Server Installation Guide]. This guide helped streamline the process.
– Configure Your Network: Port forwarding was a bit of a challenge at first, but after delving into various tutorials, I felt triumph when I finally got it right! **Getting your network settings correctly configured is crucial** for ensuring your friends can join in without a hitch.
– Test, Test, Test!: I made it a routine to run performance tests to tweak the settings. Each successful login by a friend was like hitting a high score for me!
Some Cool Ideas for Your Homelab Gaming Server
As my homelab gaming journey grew, I stumbled upon several creative applications that I just had to share! Here are some fun ideas you can implement:
– Game Streaming: Services like Parsec allow you to stream games from your server to any device. Imagine playing your favorite games on your tablet while lying on the couch!
– Private Game Servers: Set up dedicated servers for various games. Whether it’s a FPS showdown in *Counter-Strike* or a PVP war in ARK: Survival Evolved, it’s incredibly rewarding to create your own community.
– Modded Game Servers: Hosting a modded Minecraft server opened up a world of creativity. I encouraged friends to join and contribute to our ever-expanding universe—collaboration at its finest!
– Automated Backups: I’ve made it a habit to run scheduled backups of my server to ensure that I don’t lose my precious gaming world. It’s an added layer of security for peace of mind.
Navigating Challenges
Like any endeavor, there are challenges—learning curves that we all face. I remember a few nights spent troubleshooting issues that felt overwhelming. But overcoming these challenges is part of the journey.
– Server Crashes: They happen. When they do, I remind myself to stay calm and rely on the knowledge available in forums and communities.
– Performance Drops: Monitoring server performance became essential for me. Tools like Grafana and Prometheus allowed me to keep an eye on resource usage. Remember, a well-monitored server is a happy server!
– Community Management: If you host servers for friends, managing the community can be tricky. A little bit of patience and communication can go a long way!
Join the Community
There’s a vast community out there filled with enthusiasts just like you. I greatly encourage you to engage with others who share your passion for homelab gaming. Platforms like Reddit, dedicated forums, and Discord communities are flooded with knowledge and support; I often find myself learning something new every day.
If you’re interested in my personal experience, feel free to explore [r/homelab] where members share their ventures, tips, and sometimes hilarious mishaps in their homelabs.
Final Thoughts
Constructing a DIY gaming server in your homelab is more than just a technical setup; it’s an ongoing journey of learning and experimenting. The joy of creating something from the ground up is unparalleled. As you navigate through the challenges and triumphs, remember that patience and curiosity are your best friends.
I hope my story inspires you to dive into your own homelab gaming adventure. If you have any thoughts or questions about getting started, please leave a comment below—I’d love to hear from you! Happy gaming!